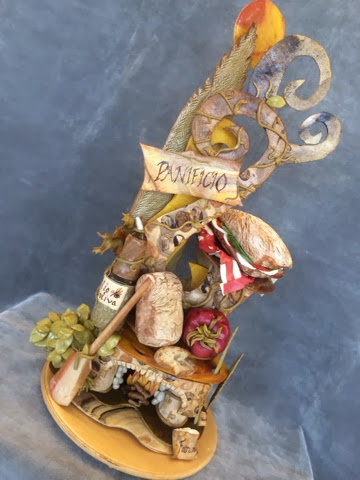
Final marketing showpieces from my junior class, after a lot of stress and aggravation the hard work pays off. Congratulations to all of the teams for a fantastic nine days you will all be missed and I hope that our paths will cross again. All the best to all of you young aspiring bakers.
Rooster
Rooster on PhotoPeach
Wednesday, January 15, 2014
Tuesday, January 14, 2014
Carpe Diem ~ Seize The Day!
I was nervous at the beginning of this lab. I had had Chef Hitz for my freshman viennoiserie class and I knew he was strict, but in a good way. My initial thoughts on the class have totally shifted. I really enjoyed making all of the pieces for each of the showpieces I made, in addition to seeing everyone else's pieces. Was it stressful at times? Yes. But was it worth it? Definitely.
At the beginning, you may hope that the class goes by fast. Don't! I wish we had more time. Enjoy each moment you have in the class because no other class is like this one. It really has become one of my favorite classes I've taken at JWU so far.
Although I already posted without images, I figured i'd repost with images for it to tie all together for us bloggers! Thanks for sharing with us Chef! It has been a great class and I will be sure to keep in touch.
As I was completing my homework project for BPA 3010, I was glad Chef Hitz decided to include photography of unique techniques that he has shown us or other classmates have demonstrated during the course of our time together in advanced decorative breads. Whether as its own section or throughout the project, I noticed, those techniques helped every single one of my classmates develop something brilliant with their work as well as my own. Personally I always remember the saying, "You learn something new every day." Believe it or not, it does happen every day whether you realize it or not.
Considering I am having some trouble with posting images to go along with my post, I am still going to share some techniques I thought were most helpful to me. Photos will be added later.
The usages of aluminum foil. I did not notice there were so many ways it could benefit a baker when creating a showpiece. It can help create movement in elements to become more realistic looking and line copper tubing to make a column for height purposes in the piece.
Using texture mats are very cool also! They come in many different sizes, shapes, and patterns. I have come to realize that adding texture to a showpiece or anything you bake, it makes a huge difference to the eye. Texturizing just one piece can make it stand out from all the rest. For example, when creating my rooster for the rooster showpiece, I decided to add some design to the body of mine. I followed all of the guidelines chef had demonstrated, baked my rooster, and it was now time to build my piece. Before I knew it, the first thing my eye went to was the rooster. Even though it was the main focal point in the piece, I saw that the texture had made it stand out that much more! Like I said, "You learn something new every day." The simple half circle indent in the dead dough made my rooster look like it had real feathers on its body.
Now that BPA 3010 is one day short of completion and the start of a new class is in the near future, make it a point to try something new every day. If seen or shown, be aware of how it can better your knowledge and education. Always remember where that one thing came from and be sure to thank the person who welcomed it in your life.
As I was completing my homework project for BPA 3010, I was glad Chef Hitz decided to include photography of unique techniques that he has shown us or other classmates have demonstrated during the course of our time together in advanced decorative breads. Whether as its own section or throughout the project, I noticed, those techniques helped every single one of my classmates develop something brilliant with their work as well as my own. Personally I always remember the saying, "You learn something new every day." Believe it or not, it does happen every day whether you realize it or not.
Considering I am having some trouble with posting images to go along with my post, I am still going to share some techniques I thought were most helpful to me. Photos will be added later.
The usages of aluminum foil. I did not notice there were so many ways it could benefit a baker when creating a showpiece. It can help create movement in elements to become more realistic looking and line copper tubing to make a column for height purposes in the piece.
Using texture mats are very cool also! They come in many different sizes, shapes, and patterns. I have come to realize that adding texture to a showpiece or anything you bake, it makes a huge difference to the eye. Texturizing just one piece can make it stand out from all the rest. For example, when creating my rooster for the rooster showpiece, I decided to add some design to the body of mine. I followed all of the guidelines chef had demonstrated, baked my rooster, and it was now time to build my piece. Before I knew it, the first thing my eye went to was the rooster. Even though it was the main focal point in the piece, I saw that the texture had made it stand out that much more! Like I said, "You learn something new every day." The simple half circle indent in the dead dough made my rooster look like it had real feathers on its body.
Now that BPA 3010 is one day short of completion and the start of a new class is in the near future, make it a point to try something new every day. If seen or shown, be aware of how it can better your knowledge and education. Always remember where that one thing came from and be sure to thank the person who welcomed it in your life.
Monday, January 13, 2014
Pain Rustique... Done Right
On Day 5 my group members and I were blessed with the task of recreating Chef's delicious recipe Pain Rustique (Pictured above).
Unfortunately this was our "every thing that can go wrong will go wrong" day of the week.
The Right Way
- Prepare your Poolish the day before mixing. (Flour, yeast, water - mix until smooth & ferment overnight)
- Properly scale all ingredients & autolyse the dough: mix together wet first, poolish next , & dry ingredients last (Holding back salt & yeast).
- Mix in 20 qt. mixer until ingredients just come together.
- Autolyse 20-30 minutes. (Cover with bun-pan bag & let sit)
- Prepare your Poolish the day before mixing. (Flour, yeast, water - mix until smooth & ferment overnight)
- Properly scale all ingredients, add dry ingredients to bowl, wet ingredients, Poolish, & yeast (Holding back salt only)
- Immediately realize mistake & proceed to freak out.
- Tell Chef.
- Explain to Chef that you cannot simply scoop out the yeast off of the top of the dry ingredients because the dry ingredients are on the bottom of the bowl.
- Give group members dirty looks for 7 seconds then proceed to mix dough in the spiral mixer with salt (Skipping autolyse).
- Mix on 1st speed 4 minutes & 2nd speed 1 minute.
5. Add salt & yeast and mix additional 1 minute on 1st speed, mix on 2nd speed until medium gluten is developed, approximately 1.5 minutes in a spiral mixer.
6. Allow to ferment 60 minutes with 3 folds at 20 minute intervals.
7. Allow to ferment additional 15 minutes.
8. Thoroughly de-gas dough & divide into uniform small rolls (approx. 2" x 2") and place on floured couche.
The Wrong Way
8. Allow to ferment shorter period of time constantly checking with Chef to make sure it is okay because your dough may over ferment. Stretch periodically.
9. De-gas dough, neglecting the center so that it is thicker than outer edges of dough.
10. Argue with group members over size of rolls. Someone says 3" x 3" & you disagree with them until they say 2.5" x 2.5" may be a more acceptable size. Feel as though it is still too large but continue to divide even as some group members give you dirty looks because they believe you are wrong.
11. Realize partially through dividing that the dough was not evenly de-gased and that although you divided the shapes perfectly in theory they are now all different shapes & sizes.
12. Decide to place scrap pieces in with smaller pieces so your rolls will be slightly even.
13. Accidentally place rolls on couche seam-side down (scrap pieces on bottom).
The Right Way
9. Proof for approximately 15 minutes.
10. Place floured side up onto loaders. Score a straight line down center & load into a steamed deck oven.
11. Bake rolls for approx. 20-22 minutes.
12. Cool & enjoy beautiful delicious rolls with a creamy colored, nutty flavored, porous crumb.
(Similar to a baguette...but better).
The Wrong Way
14. Proof for 15 minutes.
15. Place rolls flour side up on loader.
16. Realize your scrap pieces are now on the top of your loaves.
17. Sigh over dramatically & proceed to tell Chef.
18. Score only the pieces with no scraps on top.
19. Bake rolls for 20 + minutes taking them all out at the same time.
20. Cool & enjoy your misshapen, not uniform, slightly under baked or over baked rolls with a dense crumb and less than ideal taste.
In short, we screwed up. A lot.
Tips for the future:
- Always be familiar with your formula before you begin.
- Effectively communicate with your group members before moving on to the next step.
- Do not be afraid to ask for help. Other groups have most likely made this product before so ask them for help, and when in doubt always ask Chef. You are paying him to teach you so annoy him as much as you feel necessary.
Subscribe to:
Posts (Atom)